(Part 1) Reducing the Cost of Running a Personal k8s Cluster: EC2 Instances

Introduction
In my last blog post, I introduced our goal of decreasing the cost of running a personal k8s cluster, and made the case for why decreasing the cost is important. We also did some quick calculations which showed that EC2 instances are the most expensive part of our cluster, costing ~$115 per month or ~$1.4K per year. There’s no time like the present to actually start decreasing EC2 costs, so let’s get down to business.
Optimizing EC2 instances
Again, using the default Kops configuration, the m3.medium we use for the master has 1 CPU and 4 GB of memory, while the t2.mediums we use for the nodes combine to give us 4 CPU and 8GB memory.
We must first ensure our cluster actually needs all of these resources, as the most blunt and effective cost-saving measure would be reducing the size of our EC2 instances or, even better, deleting instances entirely. However, to confidently undertake those actions, we must first show our cluster is over-provisioned.
Monitoring resource usage
Previously, our cluster did not offer visibility into the resource usage of each application running on the cluster, nor did it offer visibility into the aggregate resource usage across all the applications running on the container. Our first duty is giving ourselves this visibility.
We’ll start with garnering micro insights into each application’s resource usage. By default, Kubernetes runs containers without any resource constraints, meaning that, like a non-containerized process running directly on the physical host, the processes in the container can attempt to claim all of the node’s CPU and memory. The lack of resource constraints is not a large problem when we have only one or two applications running on our Kubernetes cluster. If we find our Kubernetes cluster low on resources, we only have one or two potential culprits to investigate. However, as soon as we start running a non-trivial number of applications on our Kubernetes cluster,1 it becomes much more important to understand the minimum and maximum amount of resources allocated to each container and have confidence Kubernetes will enforce said limits.
Fortunately, Kubernetes provides
first class support
for containers specifying the minimum and maximum amount of
resources they require. Each container
can specify a resource.request and a resource.limit for both CPU and memory. A
pod calculates its resource request and resource limit by summing the resource
requests and limits for all its containers. A resource request is the minimum amount
of resources a pod needs to function. The Kubernetes scheduler will not schedule
a pod to a certain node unless the node can fulfill its resource request. The
limit is the maximum amount of resources a pod can consume. If the pod attempts
to use more CPU that its limit, it will be CPU throttled, and if it attempts to
use more memory than its limit, it will be terminated. For simplicities sake, we
define the limit and the request to be equal, essentially guaranteeing
each pod a given amount of resources. Setting them to the same value makes
determining the total resource needs of my cluster simple.
We can see an example of how to specify these values in the code snippet below.
apiVersion: apps/v1beta2
kind: Deployment
...
spec:
  ...
  template:
    ...
    spec:
      containers:
      - name: blog
        image: docker.io/mattjmcnaughton/blog
        ...
        resources:
          requests:
            cpu: "100m"
            memory: "100Mi"
          limits:
            cpu: "100m"
            memory: "100Mi"
After ensuring all containers have a resource request/limit (see this commit for more details), we can trivially calculate the resources our cluster needs. The master needs resources equal to the summation of all resource requests/limits for all pods scheduled on the master, and the nodes need resources equal to the summation of all resource requests/limits for all pods scheduled on the nodes.
By allocating all of our pods a definite set of resources, we’ve transformed our original question of “do we have an appropriate amount of resources for our Kubernetes cluster” into two simpler questions: “is our cluster correctly provisioned (i.e. is the sum of resources allocated to each pod an appropriate percentage of the cluster’s total resources)” and “are our allocations of resources to pods accurate”? We’ll explore each of these questions individually.
Is our cluster correctly provisioned?
In order for our cluster to be “correctly provisioned” it should have an amount of resources that is “just right”. As an example, we don’t want to over-provision (i.e. only use 10% of available resources), because then we are paying money for computing power that we aren’t using. Alternatively, we don’t want to under-provision (i.e. only be able to schedule 10% of our applications because our cluster doesn’t have the required resources). We want to be right in the middle.
Once we ensure each of our pods has a resource request/limit, its easy to ensure our cluster is not under-provisioned. Specifically, the scheduler will not schedule a pod if it cannot fulfill its resource request. As long as all our pods are scheduled, our cluster is not under-provisioned. We do not yet have any auto-scaling, so the only time our cluster runs new Pods is when we add them. Since pod creation is currently manual, I’m comfortable with not having automated alerts for whether were there are not sufficient resources to schedule a pod. If we later add auto-scaling, or some other process wherein our cluster would have a variable number of pods, we’ll want to revisit this decision.
We can rely upon a equally lightweight manual method for determining if we’ve
overallocated resources to our cluster. We can run
kubectl describe node NODE_NAME | grep -A 5 "Allocated" for details around
each node’s resource allocation.2
Below we display a sample of the output for one of our nodes.3

As you can see, we’re fairly well provisioned. We’re using ~70% of CPU, which is just about where we want to be. We’re only using ~40% of memory, which would suggest that we should decrease our cluster’s memory allocation while retaining its CPU allocation. While that sounds like a good idea in theory, I don’t believe its possible with the currently available EC2 instance types. The smallest compute optimized EC2 machine, the c5.large, offers our current allocation of two CPUs and 4 GB of memory for slightly cheaper. While the c5.large is slightly cheaper than two m3.mediums, we no longer have multiple nodes. If we try the opposite strategy and try to get our four CPUs via running four t2.micros, which would give us 4GB of memory instead of 8GB of memory, we’d still be paying about the same amount as we pay for two t2.mediums.
Are our allocations of resources to pods accurate?
Of course, all of the analysis we conducted in the previous section is worthless if our per-pod resource allocation is incorrect. As such, we turn our attention to whether we’ve correctly allocated resources to our pods.
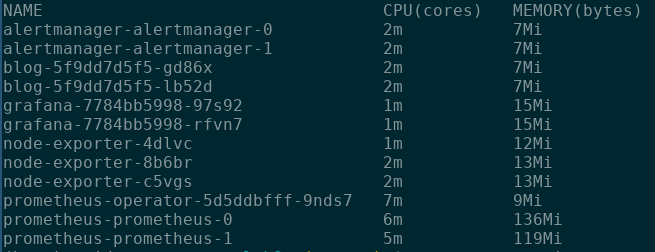
We answer these questions in two main ways. First, we can use kubectl top pods,3 which gives us a top
style resource usage report. For example, the report shown below highlights that
our prometheus-prometheus-0 pod is currently using 136Mi of the 500Mi of
memory allocated to our cluster.
While kubectl top pods is interesting, we’re even more interested in seeing
resource usage as a percentage of resources allocated, particularly when it is
tracked over time. And if we can set up alerts for when we are in-danger of
under-provisioning our applications, that’s also quite beneficial.
If you’re guessing that we’re going to use Prometheus, Grafana, and AlertManager for to accomplish this monitoring and alerting, you’re exactly right.
We start by configuring Prometheus to scrape metrics from the kubelet, which is the node agent responsible for managing the pods on the node.
Scraping Kubelet’s exposed metrics gives us a couple interesting data points for our desired monitoring.5
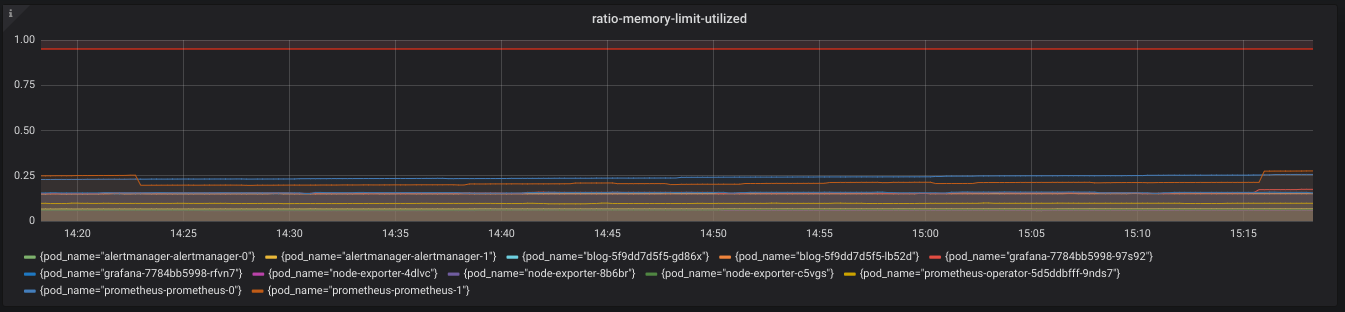
First, it defines container_memory_working_set_bytes
and container_spec_memory_limit_bytes, which are the memory the container is
using and the memory the container is allocated respectively. We can use the
query below to express the percentage of allocated memory the pod is utilizing.
sum(container_memory_working_set_bytes{container_name!~"POD", pod_name!="", namespace!~"kube-system"}) by (pod_name) /
sum (container_spec_memory_limit_bytes{container_name!~"POD",pod_name!=""}) by (pod_name)
We graph this metric via Grafana, as can be seen below.
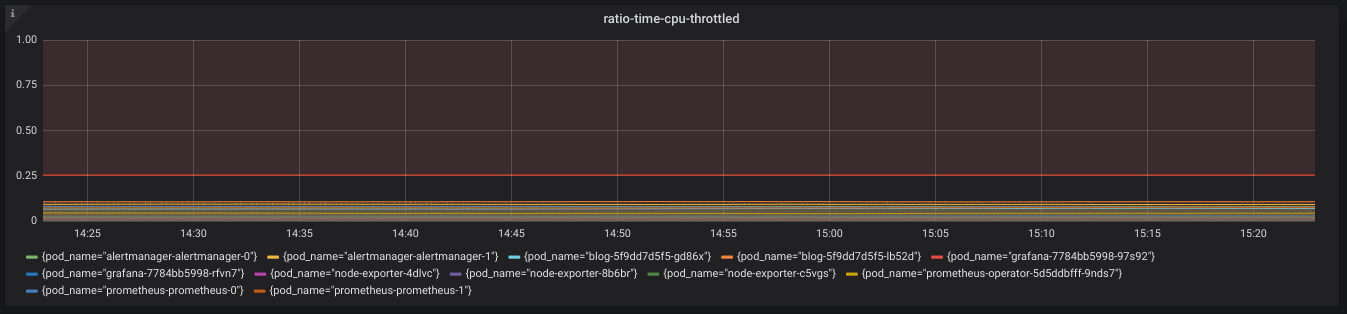
Kubelet also exposes helpful metrics for monitoring our pod’s CPU allocation. We
are given the container_cpu_cfs_throttled_seconds_total metric, which we can
use to find how often a container was CPU throttled (i.e. under-provisioned
CPU), as seen in the expression below.
sum by(pod_name) (rate(container_cpu_cfs_throttled_seconds_total{container_name!~"POD",namespace!~"kube-system",pod_name!=""}[1h]))
We again graph this metric via Grafana, as can be seen below.
Both these graphs are useful, but we don’t want to be checking Grafana every day to ensure our pod allocations are correct. Fortunately, we can use Prometheus and AlertManager to add automated alerting for when pods are under-allocated memory or CPU for a sustained amount of time. The PrometheusRules we use for these alerts can be seen below.
From our work above, we can be fairly confident we are not under-provisioning our pods, and we know that if we do somehow start under-provisioning them, we’ll receive an alert. Its fair to ask whether we are over-provisioning our pods, especially given the our fairly low memory usage. As I’m relatively new to managing pods on a Kubernetes cluster, I don’t mind being slightly over-provisioned for now, so I’m going to leave our pod resource allocations. However, its definitely something we should keep in the back of our minds.
Optimizing cost of the needed EC2 instances
From our work above, we can be relatively confident that the 1 m3.medium master and 2 t2.medium nodes currently backing our cluster are an appropriate current resource allocation. We can now turn our interest to paying AWS as little as possible for those machines.
Our largest savings come from experimenting with different AWS EC2 instance classes. on-demand instance class AWS utilizes by default. By default, AWS EC2 instances are of the on-demand instance class. This instance class prioritizes reliability and flexibility. We can start and stop paying for an instance on a per hour basis, and AWS guarantees that the instance is ours as long as we want it. However, reliability and flexibility have a price, as on-demand instances are the most expensive instance class. If we’re willing to sacrifice either reliability or flexibility, we can pay less.
To sacrifice reliability, we utilize spot instances. Spot instances are spare EC2 computing resources, for which Amazon allows you the set a max bid. The spot instance price varies based on demand and capacity. If our max bid is less than the market price, our instance will be terminated.
To sacrifice flexibility, we utilize reserved instances. Reserved instances are a billing arrangement, in which Amazon gives us a discount on EC2 instances, on the pre-condition that we reserve the instance for a time period greater than one year.
Each of these instance classes map to the different types of machines in Kubernetes.
Reserved Instances
The master is a perfect candidate for a reserved instance. We want the master to run constantly, and can also be fairly confident that the resources required by the Kubernetes Control Plan, which is the predominant work load running on the master, will be relatively consistent. If we are willing to commit to running our Kubernetes cluster for ~1 year, and I am,6 then we can purchase a m3.medium EC2 Reserved Instance for an entire year, and receive significant savings over the on-demand price.
In AWS, a Reserved Instance is strictly a billing concept, meaning we don’t need to change anything with our Kops configuration. I purchased my m3.medium Reserved Instance via the AWS UI. I purchased it for one year, and also chose a Convertible Reserved Instance. The Convertible Reserved Instance allows us to essentially “swap” our Reserved Instance for another Reserved Instance, provided that the new Reserved Instance is more expensive. This swapping ability offers production against our Kubernetes master needing more resources, in return for sacrificing a small amount of savings.
Once we have purchased a Reserved Instance, we don’t need to do anything. Essentially, AWS looks at all the EC2 instances we have running, and if any match unutilized Reserved Instances, we do not have to pay for them via the on-demand billing mechanism. So we will keep the m3.medium master Kops initially launched for us, and just start paying for it as a reserved instance.
From our calculations in part 0, an m3.medium, payed for as an on-demand instance, costs $48.24 a month, or $578.88 a year. I paid $406.00 for my m3.medium Convertible Reserved Instance, With this simple change, I saved 30% on the cost of our master, and around 10% our total cluster costs for the year.7
Spot Instances
While Reserved Instance’s are a perfect match for Kubernetes’ master, Spot Instances are a perfect match for Kubernetes’ nodes. Spot instances offer significant savings, as long as we are comfortable with the idea that they might be terminated in certain circumstances. Fortunately, we are comfortable with that possibility, because one of Kubernetes’ main benefits is its ability to abstract away the details of the underlying hardware. An application running on Kubernetes should have no concerns at all if an underlying node is terminated and replaced. Kops itself supports this by managing all nodes via an AWS Auto Scaling Group, meaning that creating new nodes in response to old nodes being terminated is a completely automated process.
Kops makes it trivial to start utilizing Spot Instances for your nodes.
As Kops documentation
explains, all we have to do is specify a maxPrice when configuring our
InstanceGroup, and Kops will launch Spot Instances instead of Reserved
Instances. We set our maxPrice as equal to the on-demand price of the instance
type.8, although it is rare that we’ll ever
actually need to pay that much.
As a quick but important aside, frustratingly, setting our max spot instance bid price equal to the on-demand instance price does not guarantee that we’ll always be able to purchase Spot Instances. Some participants in the Spot Instance market set their max price to a very high value (i.e. $1K) to ensure they will always win bids, even when it would be cheaper to switch to on-demand instances for that brief window. We are hesitant to adopt a similar tactic, because of its potential to result in a surprisingly high AWS bill. However, this Spot Instance market quirk does mean there will be short, infrequent windows (maybe once a week for 10 or so minutes) in which we cannot purchase Spot Instances.7 Such downtime is a large problem for some applications and not so big a deal for others. Ideally, we would use this issues impact on our applications’ SLOs and error budgets to determine the appropriate course of action. Yet unfortunately for our current Kubernetes cluster configuration, our monitoring/alerting runs on those nodes, so when we don’t have nodes, we have nothing to tell us when and to what extent our other services are experiencing issues. Even with these drawbacks, we still believe the cost savings of Spot Instances are worth it. Soon, we hope to fix this issue entirely by purchasing a Reserved t2.medium instance, which we will use to ensure that at least one pod is always running for our services with the most stringent uptime requirements. If you’re curious, you can follow along on the implementation here, and I’ll of course blog about it when I’m the work is complete.
The savings with Spot Instances are even more variable than the savings with Reserved Instances, but again they are quite significant. On average, for the us-west-1 region, a t2.medium spot instance costs around $.0139 an hour, compared to $.0464 an hour for an on-demand instance. This reduces our yearly spend on our Kubernetes’ nodes from $801.79 to $240.19, for a savings of around 70%. Making just this change would reduce our annual bill for our Kubernetes cluster by around ~30%.
Conclusion
By verifying our Kubernetes cluster’s needed computing resource allocation, and determining the cheapest way possible to obtain said computing resources, we’ve reduced our annual bill from ~$2K to ~1.2K, for a overall savings of around ~40%! But we aren’t done yet. We examined computing resources, but we still want to examine storage resources (EBS volumes) and networking resources (ELBs). We’ll address these ideas in the remaining blog posts in this series. Looking forward to it!
1. Assuming we want to run multiple applications is a fairly safe assumption, as it does not really make sense to use Kubernetes if you’re only running one or two applications.
2. You can find the names of the nodes in your k8s cluster with
kubectl get nodes.
3. Note, the limits are lower than the requests, because some of the
pods Kubernetes schedules by default on all nodes (i.e. kube-dns and
kube-proxy-ip-...) do not specify resource limits.
4. Note, you will need to deploy the
metrics-server in
order for kubectl top pods to work. My
personal-k8s
project includes templates for deploying the metrics-server.
5. Special thanks to the good folks at FreshTracks for their great blog post on useful Kubernetes’ container resource metrics.
6. If you cannot commit to running your Kubernetes cluster for an entire year, then you should not purchase a reserved instance.
7. Note, the exact savings you experience may very depending on the AWS region in which you’re purchasing your Reserved Instance.
8. For example, there was a brief window (a couple of minutes) on the morning of CyberMonday in which I couldn’t purchase Spot Instances.